Indoor cycling has become increasingly popular among fitness enthusiasts and professional athletes alike. However, many riders struggle to maximize their training sessions because they don’t fully understand how to adjust resistance properly. This comprehensive guide will walk you through everything you need to know about resistance adjustment, helping you achieve more effective and enjoyable indoor workouts.
Understanding Resistance in Bike Trainers
Resistance is the force that opposes your pedaling motion. When you increase it, pedaling becomes harder, simulating uphill climbs or headwinds. Conversely, decreasing resistance makes pedaling easier, mimicking flat terrain or downhill sections.
Different trainer types offer various resistance mechanisms. Magnetic trainers use magnets to create opposing force. Fluid trainers rely on liquid-filled chambers that generate progressive resistance. Meanwhile, direct-drive trainers connect directly to your bike’s drivetrain, offering the most realistic road feel.
Understanding your trainer type is crucial. Each model has unique adjustment methods and capabilities. Therefore, knowing your equipment helps you make informed decisions about your training approach.
Types of Resistance Systems
Modern bike trainers come with several resistance options. Manual trainers require physical adjustment during your ride. You typically turn a knob or move a lever to change difficulty levels. These trainers are affordable and straightforward, making them ideal for beginners.
Variable resistance trainers offer more sophisticated control. They allow gradual changes in difficulty, providing smoother transitions between effort levels. This feature proves particularly valuable when following structured workout programs that require frequent intensity changes.
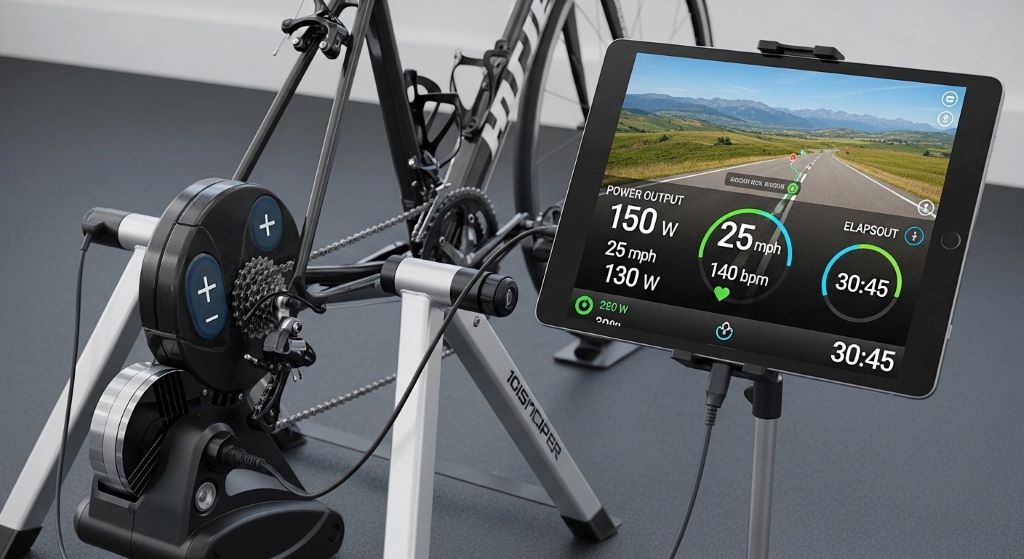
The most advanced option is the smart resistance system, which automatically adjusts difficulty based on digital commands. These trainers connect to apps and training platforms, creating immersive experiences. However, they come at a higher price point and require compatible technology.
Manual Resistance Adjustment Techniques
For manual trainers, the adjustment process is straightforward but requires practice. Most models feature a handlebar-mounted lever or remote control. Position this control where you can reach it comfortably while riding.
Start your session at a lower setting. This approach allows proper warm-up before increasing intensity. Gradually turn the dial or move the lever to add resistance. Pay attention to how your body responds to each change.
During intervals, adjust resistance between efforts. For example, decrease it during recovery periods and increase it for high-intensity segments. This method helps you maintain proper form throughout your workout.
Additionally, make small incremental changes rather than dramatic jumps. Sudden resistance spikes can disrupt your cadence and potentially cause muscle strain. Smooth transitions keep your workout flowing naturally.
Working with Electronic Resistance Control
Electronic trainers offer more precise control options. Many models include buttons on the trainer unit itself or wireless remotes for convenience. Some even integrate with smartphone apps for seamless adjustment.
Before starting, familiarize yourself with the control interface. Locate all buttons and understand their functions. Most systems use plus and minus buttons for resistance changes, but layouts vary by manufacturer.
During your ride, you can program specific resistance levels for different workout phases. Set higher levels for strength-building intervals and lower levels for endurance segments. This programming capability allows focused training on specific fitness goals.
Furthermore, electronic systems often display current resistance levels numerically. Use these readings to track your progress over time. Consistency in resistance settings helps measure improvements accurately.
Maximizing Smart Trainer Benefits
A smart resistance system revolutionizes indoor training by connecting your trainer to virtual worlds and structured workouts. These systems automatically adjust difficulty based on terrain in virtual environments or workout protocols.
Setting up your smart trainer requires initial configuration. Download compatible apps like Zwift, TrainerRoad, or Sufferfest. Connect your trainer via Bluetooth or ANT+ protocols. Follow the app’s calibration process to ensure accurate resistance application.
Once connected, the system handles resistance changes automatically. When your avatar climbs a virtual hill, you feel increased difficulty. Descending brings easier pedaling. This automatic adjustment creates engaging, realistic experiences.
Moreover, smart trainers respond to structured workout files. Upload a training plan, and the system adjusts resistance according to prescribed intervals. This feature eliminates guessing and ensures you hit target power zones consistently.
Resistance Adjustment for Different Workout Types
Different training goals require specific resistance strategies. Understanding these approaches helps optimize each session.
For endurance rides, maintain steady, moderate resistance. Choose a level that allows comfortable conversation while pedaling. This intensity builds aerobic capacity without excessive fatigue. Typically, aim for 60-70% of your maximum effort.
Interval training demands frequent resistance changes. During high-intensity segments, increase resistance significantly. This forces your muscles to work harder, improving power output. Recovery periods should feature much lower resistance, allowing partial recuperation between efforts.
Strength-focused sessions require maximum resistance settings. Pedal at slower cadences against high resistance. This approach builds muscular strength and power. However, limit these sessions to avoid overtraining.
Hill simulation workouts benefit from gradual resistance increases. Start with moderate difficulty and progressively add resistance. This mimics climbing sustained grades. Maintain steady cadence despite increasing difficulty for best results.
Common Mistakes in Resistance Management
Many riders make preventable errors when adjusting resistance. Recognizing these mistakes helps you avoid them.
Starting too hard is a frequent problem. Jumping immediately to high resistance doesn’t allow proper warm-up. Your muscles need gradual preparation for intense efforts. Always begin with lower settings and build progressively.
Another mistake involves staying at one resistance level throughout entire rides. While consistency has benefits, varied resistance creates more complete training stimulus. Mix different intensities to develop diverse fitness qualities.
Ignoring cadence when changing resistance causes problems too. Maintain appropriate pedaling speed regardless of resistance level. Generally, aim for 80-100 revolutions per minute for most workouts. Extremely low cadences under high resistance can strain joints.
Additionally, many riders forget to calibrate their trainers regularly. Calibration ensures resistance accuracy. Perform this maintenance according to manufacturer recommendations, typically every few weeks or after moving the trainer.
Fine-Tuning Resistance for Your Fitness Level
Your current fitness determines appropriate resistance ranges. Beginners should focus on building consistency rather than pursuing maximum difficulty.
Start with lower resistance settings that allow 30-45 minute rides comfortably. As fitness improves, gradually increase both resistance and ride duration. This progressive approach prevents burnout and injury.
Intermediate riders can incorporate more resistance variation. Alternate between moderate steady-state efforts and short high-resistance intervals. This combination develops both endurance and power simultaneously.
Advanced athletes should utilize full resistance ranges strategically. Plan periodized training blocks focusing on different qualities. Use smart resistance system features to replicate race-specific demands accurately.
Furthermore, listen to your body regardless of fitness level. If certain resistance levels cause pain or excessive fatigue, adjust accordingly. Sustainable progression trumps aggressive advancement every time.
Integrating Technology with Resistance Control
Modern technology enhances resistance management significantly. Power meters provide objective intensity measurements. When combined with trainer resistance, they create precise training zones.
Heart rate monitors offer additional feedback. Monitor how resistance changes affect heart rate responses. This information helps establish appropriate difficulty levels for different workout types.
Training apps collect comprehensive data about resistance usage. Review these analytics to identify patterns and progress. Adjust future sessions based on these insights for continuous improvement.
Moreover, virtual training platforms gamify resistance through challenges and competitions. Racing against others or chasing personal records makes resistance adjustment engaging rather than tedious.
Maintenance Considerations for Resistance Systems
Proper maintenance ensures consistent resistance performance. Different systems require specific care approaches.
Magnetic trainers need periodic inspection of moving parts. Check that resistance units move smoothly without sticking. Clean any accumulated dust or debris that might interfere with operation.
Fluid trainers rarely need maintenance but should be checked for leaks. Inspect the fluid chamber regularly. If you notice any seepage, contact the manufacturer immediately.
Smart trainers require firmware updates periodically. Manufacturers release updates that improve resistance accuracy and connectivity. Install these updates promptly to maintain optimal performance.
Additionally, calibrate all trainer types regularly. Follow manufacturer protocols exactly. Proper calibration maintains resistance accuracy, ensuring your training data remains reliable.
Creating Effective Resistance-Based Workout Plans
Structured planning maximizes resistance training benefits. Design weekly schedules that incorporate various resistance challenges.
Include one or two high-resistance strength sessions weekly. These should feature sustained efforts against significant resistance. Limit duration to 45-60 minutes to prevent overtraining.
Add two to three moderate resistance endurance rides. These longer sessions build aerobic capacity. Maintain steady, comfortable resistance for 60-90 minutes.
Incorporate one high-intensity interval session featuring rapid resistance changes. Alternate between maximum and minimal settings. This workout develops power and recovery capabilities simultaneously.
Furthermore, schedule at least one easy recovery ride weekly. Use minimal resistance for active recovery. This session promotes adaptation without adding training stress.
Troubleshooting Resistance Issues
Occasionally, resistance systems malfunction. Knowing how to address common problems saves frustration.
If resistance feels inconsistent, first check all connections. Loose bolts or improper setup cause irregular performance. Tighten everything according to manufacturer specifications.
For smart trainers experiencing connectivity issues, restart both the trainer and controlling device. Often, this simple step resolves communication problems. If issues persist, reinstall the controlling app.
When resistance seems inaccurate, perform a calibration cycle. Follow your trainer’s specific procedure carefully. Most systems include detailed calibration instructions in their manuals.
Moreover, if mechanical resistance adjusters stick or jam, apply appropriate lubricant. Use only manufacturer-recommended products. Improper lubricants can damage components.
Conclusion
Mastering resistance adjustment transforms indoor cycling from monotonous exercise into engaging, effective training. Understanding different resistance types helps you choose appropriate equipment for your needs. Whether using manual adjustments or sophisticated smart resistance system technology, proper technique ensures optimal workout quality.
Remember to start conservatively and progress gradually. Vary resistance throughout workouts to develop complete fitness. Maintain your equipment properly and calibrate regularly for consistent performance. Most importantly, experiment with different resistance strategies to discover what works best for your goals.
Indoor training offers unmatched convenience and control. By applying these resistance adjustment principles, you’ll maximize every pedal stroke. Your fitness will improve steadily, preparing you for whatever cycling challenges lie ahead.
Frequently Asked Questions
How often should I change resistance during a typical workout?
The frequency depends on your workout type. During interval sessions, you might change resistance every few minutes. For steady endurance rides, you may maintain consistent resistance throughout. Generally, plan resistance changes in advance rather than adjusting randomly.
What resistance level should beginners start with?
Beginners should start with the lowest resistance setting that provides noticeable effort. You should be able to maintain conversation while pedaling. As fitness improves over several weeks, gradually increase resistance in small increments.
Can I damage my trainer by adjusting resistance while pedaling?
No, trainers are designed for resistance changes during use. However, avoid extremely sudden changes that might disrupt your balance. Smooth, gradual adjustments are safer and more effective than abrupt shifts.
How do I know if my resistance is calibrated correctly?
Perform your trainer’s specific calibration procedure regularly. Additionally, if your perceived effort matches displayed power readings and heart rate responses seem appropriate, calibration is likely accurate. Inconsistent relationships between these factors suggest calibration needs.
Is higher resistance always better for training?
No, higher resistance isn’t automatically superior. Different resistance levels serve different training purposes. Variety in resistance creates well-rounded fitness. Balance high-resistance strength work with moderate endurance efforts and low-resistance recovery sessions.
Related Topics:
When Your Doctor Says “You Need to See an Audiologist” – Here’s Why
Is Wart Removal Safe During Pregnancy? Expert Advice Inside