
Every surfer knows that what happens beneath the board matters just as much as what happens on top of the wave. Fins are the steering system of your surfboard. They control speed, direction, and stability in the water. However, even the best fins in the world will underperform if they are installed incorrectly. Getting this right is not complicated. With the right tools, a little patience, and a clear process, you can install your fins confidently every single time. This guide will take you through the entire process from start to finish.
Why Fin Installation Deserves Your Full Attention
It is easy to rush through fin setup before a surf session. You are excited, the waves are pumping, and fiddling with screws feels like a chore. However, a poorly installed fin can loosen mid-session, cause unpredictable handling, or even fall out in the water. That creates a safety risk and ruins a perfectly good session.
Taking five to ten minutes to install your fins properly makes a real difference. It protects your equipment, improves your performance, and gives you one less thing to worry about once you are in the water. Therefore, treating fin installation as a genuine part of your pre-surf routine is always worth it.
Tools and Materials You Will Need
Before you begin, gather everything you need. Having the right tools on hand makes the process much faster and prevents frustration.
Here is what you will need:
- A fin key or flat-head screwdriver that matches your fin system
- The correct fins for your board and fin box type
- Fin screws that are in good condition and the right size
- A small amount of surf wax or fin screw lubricant (optional but helpful)
- A clean, dry surface to work on, such as a towel on the ground or a padded board rack
Additionally, check your screws before every session. Screws that are stripped, rusted, or bent should be replaced immediately. Spare fin screws are inexpensive and worth keeping in your board bag at all times.
Understanding Your Fin System
Not all surfboards use the same fin system. Before you start, identify which system your board uses. The most common systems are FCS, FCS II, and Futures.
FCS fins use a two-tab system that slots into two boxes on the board. They require a fin screw in each tab to lock the fin securely in place. FCS II fins use a tool-free click-in design, though screws are still recommended for performance surfing and bigger waves. Futures fins use a single, longer box and one screw to hold the fin. Each system has its own specific fin key and screw type, so make sure your tools match your system.
Additionally, some older or specialty boards use different systems altogether, such as single-fin boxes or longboard boxes. These follow the same basic principles but have slightly different installation steps. If you are unsure, check with the shaper or the brand’s website.
Step-by-Step Guide to Installing Your Fins
Now that you have your tools and understand your system, it is time to install the fins. Follow these steps carefully for a clean, secure result.
Step One: Inspect the Fin Boxes
Start by looking at each fin box closely. Check for cracks, debris, or water inside the box. If you see sand or grit in the channel, clean it out with a dry cloth or a small brush. A dirty fin box can prevent the fin from seating properly. Therefore, always start with clean, dry boxes before placing anything inside them.
Step Two: Position the Fins Correctly
Slide each fin into its box at a slight angle and then rotate it down into position. For FCS fins, align both tabs with both slots simultaneously. This takes a little practice at first, but it becomes second nature quickly. For Futures fins, slide the fin tab forward into the front of the box, then tilt the back of the fin down until it lies flat.
Proper fin alignment at this stage is essential. The fin should sit flush against the board with no gaps and no rocking. If it tilts or moves when you press on it, recheck the positioning before reaching for your screws.
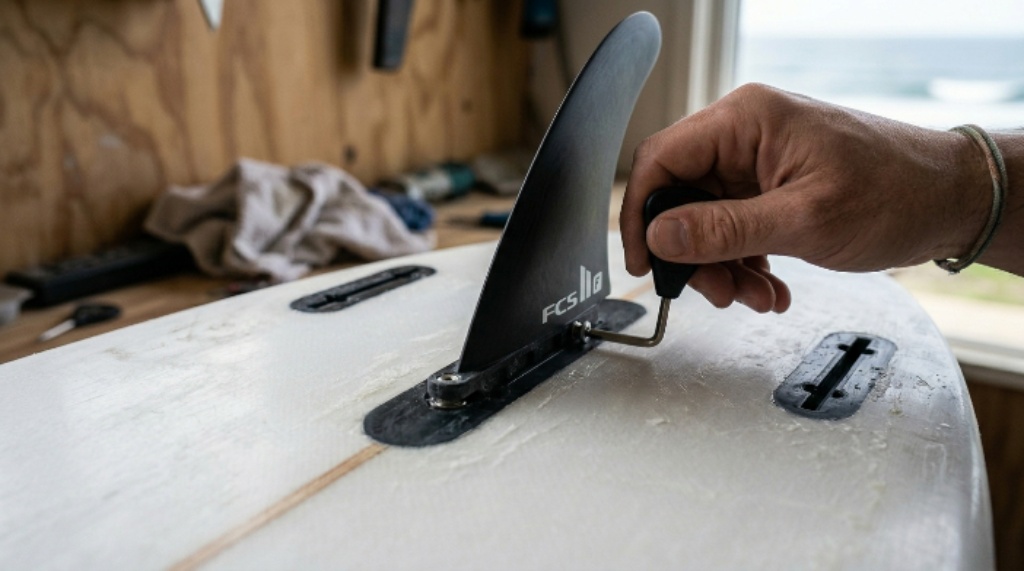
Step Three: Insert and Tighten the Screws
Once the fin is correctly seated, insert the screw into the screw hole. Turn it clockwise by hand first to make sure it threads smoothly. Then use your fin key to tighten it firmly. You want the screw to be snug and secure, but do not overtighten. Overtightening can strip the screw head or crack the fin box. A firm, confident tighten is all you need.
If you find that the screw feels rough going in, a tiny dab of surf wax on the threads can help it turn more smoothly. This small trick also makes removal easier after your session.
Repeat this process for each fin. Take your time with each one rather than rushing through all three at once.
Step Four: Do a Final Check Before Paddling Out
With all fins installed, give each one a gentle tug and a side-to-side wiggle. None of them should move at all. If any fin shifts, remove it, recheck the positioning, and reinstall it before entering the water. This final check is a small step that can save you from a frustrating experience in the surf.
Surfboard Setup Tips for Better Performance
Correct fin installation is just one part of a complete surfboard setup. A few additional surfboard setup tips can help you get even more out of your equipment.
Consider the placement of your fins within the box if your system allows for adjustment. Moving fins forward increases speed and looseness. Moving them back adds drive and control. Many surfers experiment with fin placement to match different wave conditions. However, always start in the middle position if you are unsure and adjust from there based on how the board feels.
Additionally, think about the fin configuration that suits your surfing style. A thruster setup with three fins suits most surfers in most conditions. A twin fin setup feels loose and fast in small, fun waves. A quad setup generates excellent speed and hold in larger, more powerful surf. Choosing the right configuration is as important as installing the fins correctly.
Common Mistakes to Avoid During Fin Screw Installation
Even experienced surfers make mistakes with fin screw installation. Knowing what to watch out for helps you avoid them.
One of the most common mistakes is using the wrong screw for the fin system. FCS and Futures screws are not interchangeable. Using the wrong one can damage the box or fail to hold the fin at all. Always double-check before inserting any screw.
Another frequent error is skipping the inspection step. A cracked fin box will not hold a fin securely no matter how tight the screw is. If you notice any damage to a box, have it repaired by a shaper before surfing.
Finally, some surfers install their fins without checking fin alignment at all. A fin that is slightly twisted or angled incorrectly will cause the board to pull to one side. Therefore, proper fin alignment is not something to skip, even when you are in a hurry.
Removing and Storing Your Fins Properly
After your session, remove your fins if you plan to travel or store your board for more than a day or two. Leaving fins installed during transport increases the risk of breakage. It also puts ongoing stress on the fin boxes.
To remove fins, simply reverse the installation process. Loosen each screw counterclockwise and set the screws somewhere safe — a small zip-lock bag in your board bag works perfectly. Then tilt the fin up and slide it out of the box.
Store your fins in a fin pouch or wrap them in a soft cloth. Keep the screws with the fins so you never have to search for them before your next session.
Conclusion
Installing surfboard fins and screws properly is a skill every surfer should develop. It protects your equipment, keeps you safe in the water, and helps your board perform exactly as it was designed to. Start by identifying your fin system, gather the right tools, and always inspect your boxes and screws before you begin. Follow each installation step carefully, pay attention to fin alignment, and finish with a solid tug test before paddling out.
Applying the right surfboard setup tips and taking fin screw installation seriously will make every session smoother. The process only takes a few minutes, but the benefit it brings to your surfing lasts the entire session. Treat it as a ritual, not a chore, and your board will reward you every time you hit the water.
Frequently Asked Questions
How tight should fin screws be?
Fin screws should be tightened firmly until snug but not forced. You want them secure enough that the fin cannot move, but overtightening can strip the screw or damage the fin box. A firm hand tighten with a fin key is usually all that is needed.
Can I use any fin screw in any fin system?
No. FCS and Futures fin systems use different screws. Using the wrong screw type can damage the box threads or fail to hold the fin in place. Always use the screw designed for your specific system.
How do I know if my fin alignment is correct?
A correctly aligned fin sits perfectly flush with the board and does not rock, twist, or shift when pressed. If the fin tilts to either side or has a visible gap between the base and the board, it is not seated correctly and needs to be repositioned.
How often should I replace my fin screws?
Replace fin screws as soon as you notice any rust, stripping on the head, or bending. Damaged screws can fail suddenly in the water. Keeping a few spare screws in your board bag means you are always prepared with fresh hardware.
Is it necessary to remove fins after every surf session?
It is not strictly necessary after every session, but removing fins before travel and long-term storage is highly recommended. It reduces the risk of breakage and takes stress off the fin boxes over time.
Related Topics:
The Ultimate Surf Showdown: Pro Taghazout Bay Surfing Event
Kids Cruiser Review: Sangde Easy Way 31” Cruiser Specs and Benefits